
Setting up Ruby on Rails with PostgreSQL
I just spent a long time getting my Windows machine setup with Ruby on Rails and the PostgreSQL database in order to work on some software development. Here are the steps I followed.
Docker + Ruby on Rails
Ideally, I could have set things up as a docker container, with the steps here, but that didn’t work at all. I had a lot of issues with docker on my machine, which may have come down to my own misunderstanding, or may have had to do with some similar bugs reported here or here or maybe here. In any case, I took a different approach.
Install Linux Subsystem
The first step was getting a Linux subsystem installed on Windows. I mostly followed the steps here. But I had some diversions due to issues. In the end my steps were as follows:
Open a Windows PowerShell as an admin and run
dism.exe /online /enable-feature /featurename:Microsoft-Windows-Subsystem-Linux /all /norestart
to enable the WSL subsystem feature.
Then run
dism.exe /online /enable-feature /featurename:VirtualMachinePlatform /all /norestart
to enable the virtual machine feature.
I then needed to download and run the WSL2 (version 2!) kernel updater shown in step 4 at the link above.
After that update, back in the admin PowerShell, I ran:
wsl.exe --set-default-version 2
(Note: in many cases I had to add an .exe to my commands, because e.g., wsl <some command> was not working.)
On the Microsoft store, I installed Ubuntu-20.04.2 LTS. Now I can open an Ubuntu shell on my machine!
Aside: Getting Ubuntu Shell Looking Nice
I added to my .bashrc (found in the Ubuntu home directory ~/.bashrc) the following:
parse_git_branch() {
 git branch 2> /dev/null | sed -e '/^[^*]/d' -e 's/* \(.*\)/(\1)/'
}
if [ "$color_prompt" = yes ]; then
 PS1='${debian_chroot:+($debian_chroot)}\[\033[01;32m\]\u@\h\[\033[00m\]:\[\033[01;34m\]\w\[\033[01;31m\] $(parse_git_branch)\[\033[00m\]\$ '
else
 PS1='${debian_chroot:+($debian_chroot)}\u@\h:\w$(parse_git_branch)\$ '
fi

# THE SIX LINES BELOW are the default prompt and the unset (which were in the original .bashrc)
#if [ "$color_prompt" = yes ]; then
#    PS1='${debian_chroot:+($debian_chroot)}\[\033[01;32m\]\u@\h\[\033[00m\]:\[\033[01;34m\]\w\[\033[00m\]\$ '
#else
#    PS1='${debian_chroot:+($debian_chroot)}\u@\h:\w\$ '
#fi
#unset color_prompt force_color_prompt
Basically, I commented out the default behavior and added the git branch parser so I can see what git branch I am on in the shell (if I’m in a repo folder).
There’s a lot more you can do in the ~/.bashrc file to customize your shell. Like you can set what commands are run when the shell opens, because this file is run everytime you open a new shell.
Setting up Ruby on Rails
Now that I have a Linux virtual machine on my PC, I followed these steps to get Ruby on Rails running. There were again some diversions due to errors, but the general steps (and commands) were:
Ruby
In the Ubuntu WSL shell, run:
sudo apt-get update
sudo apt-get install git-core curl zlib1g-dev build-essential libssl-dev libreadline-dev libyaml-dev libsqlite3-dev sqlite3 libxml2-dev libxslt1-dev libcurl4-openssl-dev software-properties-common libffi-dev
These are some dependencies. Once that’s done we need a Ruby version manager called rbenv. That is installed with these commands:
cd
git clone https://github.com/rbenv/rbenv.git ~/.rbenv
echo 'export PATH="$HOME/.rbenv/bin:$PATH"' >> ~/.bashrc
echo 'eval "$(rbenv init -)"' >> ~/.bashrc
exec $SHELL

git clone https://github.com/rbenv/ruby-build.git ~/.rbenv/plugins/ruby-build
echo 'export PATH="$HOME/.rbenv/plugins/ruby-build/bin:$PATH"' >> ~/.bashrc
exec $SHELL
(Note the echo ... commands send some copy into the /.bashrc via the >> shovel operator. Now this code will be run whenever the shell opens or whenever we run exec $SHELL.)
We now want to install Ruby with the manager. For my current project, I needed version 3.1.2, so I installed that at the Ubuntu shell with:
rbenv install 3.1.2
Then set it to be the global Ruby version for the shell with:
rbenv global 3.1.2
Now whenever I want to install or switch versions in a shell I can just do
rbenv install <version>
rbenv global <version>
And confirm the version with
ruby -v
We also need the all-important bundler gem, which is a Ruby environment manager (kinda like conda for python?). In the Ubuntu shell I ran:
gem install bundler
rbenv rehash
Git
At the Ubuntu shell I ran:
git config --global color.ui true
git config --global user.name "YOUR NAME"
git config --global user.email "YOUR@EMAIL.com"
ssh-keygen -t rsa -b 4096 -C "YOUR@EMAIL.com"
The first three commands are just for setting some colors and my username on Github “Ben Purinton” and email. The last ssh-keygen command generates a public/private SSH key. The last command asks for a location (I used the default ~/.ssh/id_rsa.pub) and password ([redacted]).
I put the public key on my Github profile by pasting the output of:
cat ~/.ssh/id_rsa.pub
to the relevant area of my Github account (“Settings” > “SSH”).
Now I don’t need to go and enter my Github password all the time! I can check it’s working by running ssh -T git@github.com, which gives back some “you’re connected” copy.
Rails
To install Rails, at the Ubuntu shell I ran:
curl -sL https://deb.nodesource.com/setup_12.x | sudo -E bash -
curl -sS https://dl.yarnpkg.com/debian/pubkey.gpg | sudo apt-key add -
echo "deb https://dl.yarnpkg.com/debian/ stable main" | sudo tee /etc/apt/sources.list.d/yarn.list

sudo apt update
sudo apt-get install -y nodejs yarn
These are to cover dependencies for Rails. NodeJS is a Javascript runtime and Yarn is a package manager.
Now I can install Rails (which is just a gem!) by running:
gem install rails -v 7.0.4
The version can of course be changed, but I just used the latest version (7.0.4).
I also need to rehash via:
rbenv rehash
And confirm the install via:
rails -v
PostgreSQL
Now came the really annoying part. I’ll spare all the gory details, but here’s what worked for me. I began with the steps here, but did NOT create a new user. My commands were:
sudo apt-get remove postgresql
To remove any previously installed package. (Note: if you really want to purge postgresql then you need to run sudo apt-get --purge remove postgresql*).
Then I installed the database and its dependencies with:
sudo apt install postgresql postgresql-contrib libpq-dev
Now it should work! You just need to type:
sudo service postgresql start
To start the database. You can stop it by changing start to stop
You can also start a database with sudo pg_createcluster 14 main (changing 14) to whatever version you have installed, which you can check by doing an ls /etc/postgresql where you should see a folder with the version number. Actually, in that folder you will find the named databases (e.g., main). Oh and while I’m at it with these run on thoughts, when things are really messed up you can also drop a database wtih pg_dropcluster… Oh, and by the way, the database seems to exist at both /etc/postgresql/14/main/ AND /var/lib/postgresql/14/main/, go figure… TLDR; follow the steps / commands above and below and hopefully you don’t need to worry about all these asides.
Everytime we start a shell, we need to run:
sudo service postgresql start
But if you forget, when you go and start your Rails app, you’ll immediatelly get an error connecting to ActiveRecord, so that’ll be your reminder to start the database. You could also add the command to ~/.bashrc.
How to fix postgres user error
Thought I was done? Me too! Nope! When I tried to bin/setup or rails server in my Rails app that I wanted to work on, I got the error:
ActiveRecord::DatabaseConnectionError: There is an issue connecting to your database with you username/password, username: postgres.
When you install postgres I guess it generates a superuser named postgres that has full control over databases you create. But the Rails app I was working in said there was some error with this profile / password combo (that I had no part in setting up…)
Luckily, a colleague pointed me towards this post, which I summarize:
Running (psql is a terminal-based front-end to PostgreSQL):
psql -U postgres
Gave me the error message:
psql: error: FATAL: Peer authentication failed for user "postgres"
Uh-oh! I need to configure a password!
First I ran:
sudo -i -u postgres
That opened a sub-shell as the postgres user (as opposed to the username I used to setup my Ubuntu subsystem: bpurinton). Now at this new sub-shell prompot I ran:
psql
which opens the PostgreSQL terminal, where the prompt starts with postgres=# and you enter commands after that #. Now I ran:
ALTER USER postgres PASSWORD 'postgres';
To give the postgres superuser a password (in quotation marks)! The above returns ALTER ROLE. Great, thanks for letting me know. Now I can exit the postgres terminal by typing \q at the # prompt, then exit the postgres user subshell by typing exit, and wind up back at my standard Ubuntu shell.
Another step! I need to alter the pg_hba.config file to allow access. Using an editor (I just did it with nano):
sudo nano /etc/postgresql/14/main/pg_hba.conf
14 and main would need to be changed if you have a different postgres version or cluster name. Basically, the file says, somewhere near the bottom this:
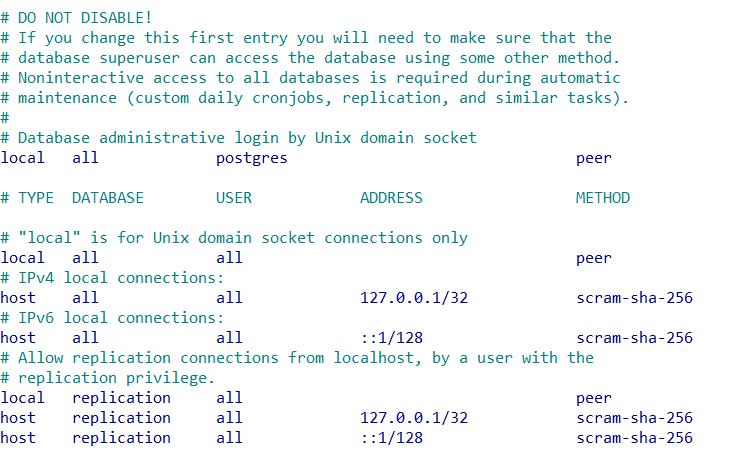
And I needed to change all the peer keywords to something like scram-sha-256, like so:
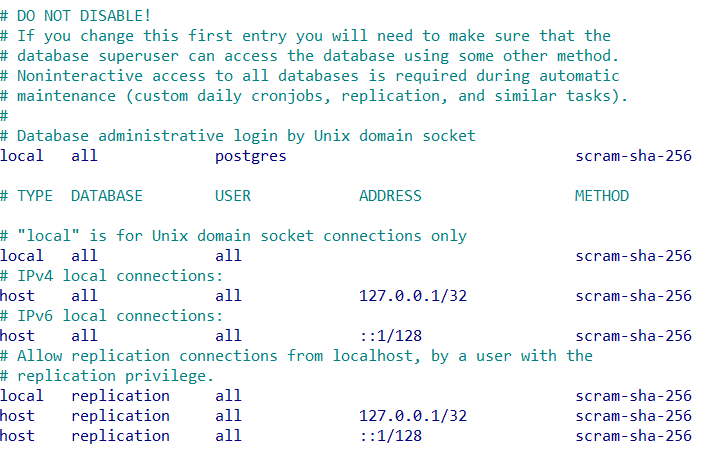
Now, with the file changed and saved, back at the Ubuntu shell I run:
sudo service postgresql restart
then:
psql -U postgres
and I don’t get any errors and now I’m good to go! bin/setup and rails server work. Finally!